Get ready for a Yakuza experience of unprecedented scale! Follow five characters across five Japanese cities, each trying to achieve their dream. The connections between them bring them together, but the conflict that unfolds is nothing any of them could have predicted.
Chapter-aligned list of substories, trophies, and choices to pick up while progressing.
CH 2Part 2 — Saejima: Hunter
MISSABLE
'Hunter and Killer' — defeat Yama-oroshi
Before Saejima's part wraps
Run the Hunter sideline to completion and bring down Yama-oroshi during Saejima's chapters. Once the story shifts off Saejima, the main-run window is gone.
CH 3Part 3 — Haruka: Road to Fame
MISSABLE
'You're the Princess' — win the Princess League
Haruka's part — before Finale Ch.4
Run 'The Road to Fame' to completion and take the Princess League finals. Quit being an idol in Finale Ch.4 and both the trophy and the 100% counter lock together.
MISSABLE
'Trendy Idol' — sample every job type
Haruka's part
Accept every job type that appears in 'The Road to Fame' (photoshoot, radio, interview, etc.) at least once. Close out Haruka's chapter and the menu won't surface them again on the main save.
CH 4Part 4 — Shinada: Baseball Shadow
MISSABLE
'Big Hitter' — clear 10 of Shinada's baseball sub-missions
Before Shinada's part ends
Clear 10+ of the baseball-cage sub-missions that only show up in Shinada's chapters. A few are one-shot with no retry, so take them as they appear.
CH 5Finale — Hall of Famer
MISSABLE
'Hall of Famer' — full 100% (gated on Haruka)
Before Finale Ch.4
Big chunks of the 100% list run through Haruka's idol/dance/jobs track, so finish them before Finale Ch.4. Several Kamiyama Works crafting mats are one-per-run too — don't sell or burn them casually.
Substories
78 entries
~79 substories across 5 protagonists (Kiryu/Saejima/Haruka/Akiyama/Shinada) and 5 cities (Nagasugai=Fukuoka, Tsukimino=Sapporo, Sotenbori=Osaka, Kamurocho=Tokyo, Kineicho=Nagoya). Kiryu/Saejima/Akiyama/Shinada substories use standard combat; Haruka's chapter uses dance/idol minigame mechanics with no combat. Chapter-gated — some are missable.
Kiryu18
#01From a Distant Land
▼
Nagasugai — Fukuhaku St. north
Trigger: Chapter 2 — appears on the street after the Aizawa/Morinaga fight.
A young man from Okinawa is lost on his way to Kamurocho. Kiryu hears him out and helps.
RewardEXP
#02Taxi S.O.S.
▼
Nagasugai — Gion St.
Trigger: Talk to the troubled taxi driver on Gion St.
Kiryu takes the wheel as a taxi driver — introduces the Taxi Driver minigame line.
RewardUnlocks Taxi Driver missions
#03King of the Group Date
▼
Nagasugai — Oosebashi St. east
Trigger: Progress the Taxi Another Drama first, then talk to the man.
Prereq: Taxi Another Drama in progress
A man asks Kiryu to liven up his group date. Pick smooth lines to carry the table.
RewardEXP
#04Chase the Kidnappers
▼
Nagasugai — Chikuzen River St.
Trigger: Chapter 2 — hear screams on Chikuzen River St. after the boss fight.
Witness a kidnapping in progress. Chase down and beat the abductors. Missable.
RewardEXP + recovery item
#05Reminded of Haruka
▼
Nagasugai — Chikuzen River St. south
Trigger: Talk to the crying girl on Chikuzen River St. south.
Help a little girl find her mother — the encounter reminds Kiryu of Haruka.
RewardEXP
#06Cyber Terror
▼
Nagasugai — Oosebashi St. east
Trigger: After the Chapter 2 boss fight, talk to the man with a laptop.
A self-proclaimed hacker tries to threaten Kiryu. Refuse and beat his crew. Missable.
Choices
Q. 'Hand over the money.'A. Refuse
RewardEXP + cash
#07Kiryu the Method Actor
▼
Nagasugai — Hakuchikuzen St.
Trigger: Talk to the film director on the street.
A director needs someone to play a yakuza role. Kiryu plays the part on the spot.
RewardEXP
#08Aren't You Kiryu-san?
▼
Nagasugai — Fukuhaku St. west
Trigger: A young man recognizes Kiryu on Fukuhaku St. west.
A man from Tokyo bumps into Kiryu in Fukuoka. Play it cool to keep your cover.
Choices
Q. 'Aren't you Kiryu-san?'A. You've got the wrong guy
RewardEXP
#09A Knock at the Door
▼
Kiryu's apartment — bedroom
Trigger: Try to sleep in Kiryu's apartment after Chapter 3.
Someone knocks in the middle of the night. Kiryu answers in person.
RewardEXP
#10The Dragon's Seafood Bowl
▼
Nagasugai — Chikuzen St. north
Trigger: Talk to the seafood-bowl shopkeeper.
Help the seafood-bowl owner pick out fresh ingredients to revive his shop's flavor.
RewardEXP + recovery item
#11Glittering Meteor
▼
Nagasugai — Fukuhaku St. east
Trigger: After the Chapter 2 boss fight.
A masked figure appears. Kiryu sorts it out with fists. Missable.
RewardEXP + mask accessory
#12Dragon Mask Returns
▼
Nagasugai — Nagasugai Ave. south
Trigger: After the prior mask substory.
The 'Dragon Mask' returns and challenges Kiryu — finish what was started.
RewardEXP + accessory
#13Tenjin-sama, Please!
▼
Nagasugai — Nagasugai St. north
Trigger: Talk to the exam-prep student on the street.
A student prays for exam luck. Kiryu accompanies him to the shrine.
RewardEXP
#14Runaway Food Stall
▼
Nagasugai — Myoe St. east food stall
Trigger: After the Chapter 2 boss fight, near the food stall.
A runaway food cart drags everyone in — short missable brawl event.
RewardEXP + recovery item
#15Springiness Is Everything
▼
Nagasugai — Ramen stall 'Tamasa'
Trigger: Enter the Tamasa ramen stall.
Settle a customer complaint at the ramen stall — turns into a lecture on noodle 'koshi'.
RewardEXP + ramen recovery item
#16Reunion with Mack
▼
Nagasugai — Kiryu's apartment
Trigger: Return to the apartment after Chapter 3.
An old acquaintance, Mack, drops by Kiryu's place.
RewardEXP
#17Amon
▼
Kamurocho — New Serena
Trigger: Clear all substories for every protagonist, then pick up the letter at New Serena.
Prereq: All substories cleared for all 5 protagonists
The Amon assassin family challenges all five protagonists — series-trademark superboss rush. Missable (requires full completion).
RewardAmon Clan defeat trophy + top-tier gear
#18The Finest Seasoning
▼
Kamurocho — Kissaten Alps
Trigger: Clear every Tatsuya taxi mission, then visit Kissaten Alps.
Prereq: All Tatsuya Another Drama missions cleared
A final conversation with Tatsuya — an epilogue-style closer for Kiryu's chapter.
RewardEXP + completion credit
Saejima15
#19Lies and Truth
▼
Tsukimino — Nakatsu St.
Trigger: Trigger on the street after the casino fight.
Someone tries to leak Saejima's whereabouts — sort out who's telling the truth.
RewardEXP
#20Snow Festival Street Performer
▼
Haruka15
#34The Letter
▼
Sotenbori — Shoufuku-cho west
Trigger: Talk to a fan on the street — no combat, idol-life event.
Accept a letter from a young fan and reply in person — no combat, dance/idol style.
RewardFan affection + EXP
#35Source of Strength
▼
Akiyama15
#49Resolve to Abandon the Dream
▼
Sotenbori — Shoufuku-cho
Trigger: Trigger on the street after the Saigo fight.
A young man wants to give up his dream to repay a loan — Akiyama questions his use of money. Missable.
Choices
Q. 'I'm giving up the dream.'A. Don't give up
RewardEXP + recovered cash
Shinada15
#64Tainted Heart
▼
Kineicho — M Store
Trigger: Talk to the clerk in front of M Store.
Witness a shoplifter at the M Store — Shinada nabs the thief.
RewardEXP + drink item
#65Daddy / Papa
▼
Collectibles
4 categories
Region-by-region collectibles and side-mission rewards grouped by category.
Local Framer — Print Club Regional Frames
Visit every Print Club booth across the six cities and shoot one photo with the regional frame to unlock 'Local Framer'.
Sightseeing Dragon — Viewpoints in Every City
Photograph the marked viewpoint in every city to unlock 'Sightseeing Dragon'. Easiest done alongside city exploration after the camera unlocks.
Eyes on the Ground — 100 Pickups
Pick up 100+ ground items (trash / map fragments / lottery tickets / locker keys) to unlock 'Eyes on the Ground'. Builds passively while walking the cities.
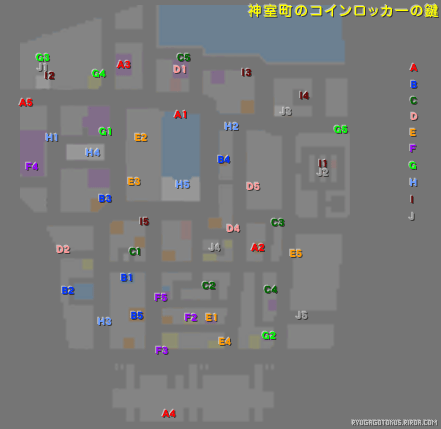
Coin Lockers — All 100 Keys & Rewards (Both Cities)
All 100 coin-locker keys (50 Kamurocho + 50 Sotenbori) with locations and contents. 'Look at ~' spots need the right camera angle to reveal the shine. Map numbers match the card numbers.
100▼
Keys come from shining ground spots; some only appear at the right camera angle.
Click a red dot on the map for details. Collected dots show a green check.
Collected
0 / 50
No.01
A1
No.02
A2
No.03
A3
No.04
A4
No.05
A5
No.06
B1
No.07
B2
No.08
B3
No.09
B4
No.10
B5
No.11
C1
No.12
C2
No.13
C3
No.14
C4
No.15
C5
No.16
D1
No.17
D2
No.18
D3
No.19
D4
No.20
D5
No.21
E1
No.22
E2
No.23
E3
No.24
E4
No.25
E5
No.26
F1
No.27
F2
No.28
F3
No.29
F4
No.30
F5
No.31
G1
No.32
G2
No.33
G3
No.34
G4
No.35
G5
No.36
H1
No.37
H2
No.38
H3
No.39
H4
No.40
H5
No.41
I1
No.42
I2
No.43
I3
No.44
I4
No.45
I5
No.46
J1
No.47
J2
No.48
J3
No.49
J4
No.50
J5
Yakuza 5 has the densest minigame spread in the series. Each of the five protagonists gets an exclusive activity (Kiryu's taxi, Saejima's hunting, Akiyama's dance battles, Haruka's idol career, Shinada's baseball) on top of the shared parlor and arcade lineup. For the Completion List and 'Life is Entertainment' (play every minigame once) you'll need to touch each entry below at least once.
Driving / Racing
Taxi Driver (Kiryu)
Difficulty
Nagasugai, Fukuoka (Kiryu's chapter)
Kiryu's exclusive cab-driving activity, split into delivery runs, conversation missions, and full-on drift races. The race missions are the real completion wall.
Delivery runs grade you on obeying traffic rules and passenger comfort — drive smoothly, avoid hard braking, speeding, and collisions.
In races, drift every major corner with Circle — once blue sparks appear you get a speed boost.
Conversation missions just need the right dialogue choices for each passenger, independent of driving skill — knock them out freely.
Never use Turbo on a corner — save it for the final straightaway. Boosting into a turn just slams you into the wall or slows you down (per GameFAQs guide).
The rival always rubber-bands back no matter how far ahead you get, so don't burn yourself out building an early lead — settle it with the final-straight Turbo instead.
Tune your car well with Taxi Points before the actual races (e.g. Flight of Fancy); doing the delivery and conversation missions first gives you a healthy starting pile (Steam conversation-mission guide).
The snowy mountains near Tsukimino (Saejima's chapter)
Saejima's exclusive blizzard survival activity — the 'Hunter and Killer' side story combining first-person shooting, trap-setting, and managing cold and hunger.
Keep an eye on body heat and rations — sell game and foraged items to the trader for traps, repair kits, and food.
Big game (bears) are best lured into traps or downed with well-placed first-person shots at weak points rather than head-on.
There's also a separate snowball-fight 'Winter Combat' minigame at the end — grab it too for completion.
A bear in its defensive side-to-side pacing reads your aim and dodges — only shoot for the head during its charge or when it rears up on its hind legs. Mid-charge it stares at the ground and can no longer track your rifle (Steam & Nintendo Okie guides).
Music / Rhythm
Dance Battle (Akiyama)
Difficulty
Sotenbori club (Akiyama's chapter, 'Dancin' Akiyama')
Akiyama's rhythm dance-off against the dancer Hide — hit the directional and button cues as they appear, on time, to outscore your rival.
Input each cue the instant it lands on the judgement line — too early or too late breaks your combo.
Hold notes need the button held to the very end for full marks — don't release early.
If you're used to rhythm games you can clear it without upgrades — memorizing the patterns makes it much easier.
Stacking accurate inputs pushes the dance gauge past its marker; press L1 (while the 'bomb' isn't counting down) to fire a Dance Heat move and open up a scoring lead in one shot (GameFAQs).
Haruka's sprawling rhythm career — lessons, dance battles, and the Princess League on her road to idol stardom. It's the longest and hardest minigame in Y5, built around landing Climax Heat finishers.
Dance battles ask for the correct direction + button on the rising bars — stack accuracy to fill the Climax Gauge.
When the gauge is full, trigger Climax Heat for a huge score swing — timing the activation decides the match.
If your rhythm is shaky, raise Body stats to unlock Heart-X moves and end battles faster.
Each Princess League song has its own pattern — preview the track once to scout the tricky sections.
Sports
Baseball Batting (Shinada)
Difficulty
Kineichou Batting Center, Nagoya (Shinada's chapter)
Shinada (an ex-pro ballplayer) takes on a batting game where a human pitcher throws and a four-petal targeting reticle handles timing and placement. Home-run and total-distance challenges are the completion goals.
Swinging on the brown circle gives a flat 80m, but waiting for it to flash yellow launches it 100m+.
Coach Igarashi's 'Heat Eye' (L1) triggers a bullet-time slowdown, giving you all the time you need to line up the swing.
Higher challenges grade combined distance over 10 pitches — favor yellow home runs over the safe 80m.
Find Coach Igarashi at the 'FIRST SHOT' counter on the east side of Goshiki Street; clearing his first lesson unlocks Heat Eye, and afterward an 'unlimited Heat Eye' course lets you spam L1 to nail the yellow timing in slow-mo all you want (Ruliweb & Yimbocarimbo).
Gambling
Mahjong
Difficulty
Mahjong parlors in each city
Standard Japanese riichi mahjong — the series' biggest wall if you don't know the rules, but completion only needs a single winning hand.
Keep your hand fully closed (never call Pon/Chi) so you can declare Riichi.
Chase Tanyao (only simples 2–8); declare Riichi at tenpai and a yaku attaches automatically.
A rhythm game where you press the matching button as notes reach the judgement line, scoring your performance. Each character has their own signature songs.
Hit each note exactly on the line — watch the note flow, not the lyrics, for better accuracy.
Hold notes until the very end for full marks, and learn new songs on the easy difficulty first.
A lineup of real SEGA arcade games inside Club SEGA (including rhythm titles and the UFO Catcher crane). Some high-score targets count toward completion.
For the UFO Catcher, line the claw directly over the prize's center of gravity before dropping.
On the rhythm cabs, repeat one song to memorize the chart and hit the target score faster.
The Vertical Double Rifle aims faster than the horizontal one, steadying shots on moving targets. In a deer herd only the antlered buck fights back — drop it first with a headshot.
Traps are mostly inefficient and only really used for contracts (catching martens): lay 2–3 cage traps on the white-light spots, and listen for the music cue that plays when you're near huntable game. The 5 contract missions also count toward completion (TrueAchievements).
Dance battles are about surviving AND winning, not just winning — Haruka starts with the small heal 'Heal Me Mix', so juggle: pop a heal with L1 when HP gets low, and a 'Rainbow Star' scoring move when you're safe (Yimbocarimbo & GameFAQs).
You assign Heat moves to the △□○× face buttons. If your rhythm is shaky, the most reliable build is to slot Body-upgrade 'Heart-X' moves, which drain the opponent's HP fast to end the battle early.
After clearing the stories, Yoko's training opens under Iwao Bridge. Two sessions fill the Climax Gauge, but finish ALL of them — the final reward is an infinite Climax Heat Gauge. Against T-Set in the finals, the standard line is to fire Climax Heat right after the dance interlude (Yimbocarimbo).
Trophy/completion warning: picking the 'retire' option mid-Princess League makes the trophy unobtainable. Lowering the dance-battle difficulty does NOT affect the trophy, so drop it if you're struggling (Ruliweb trophy guide).
Princess League Finals — Haruka vs T-Set (Yakuza 5 Remastered)
Scoring is 10 for a foul, 50 for a hit, 100 for a home run. Completion means clearing all 6 courses, and the 'home-run king' trophy separately needs 10 commission missions — knock out the challenges and contracts together (GameFAQs & Ruliweb).