In this action-adventure thriller, detective Takayuki Yagami goes undercover to unravel a string of twisted crimes at a high school in Yokohama, Japan. Crack the case and some skulls with brutal combat featuring three unique fighting styles and an arsenal of private eye tricks.
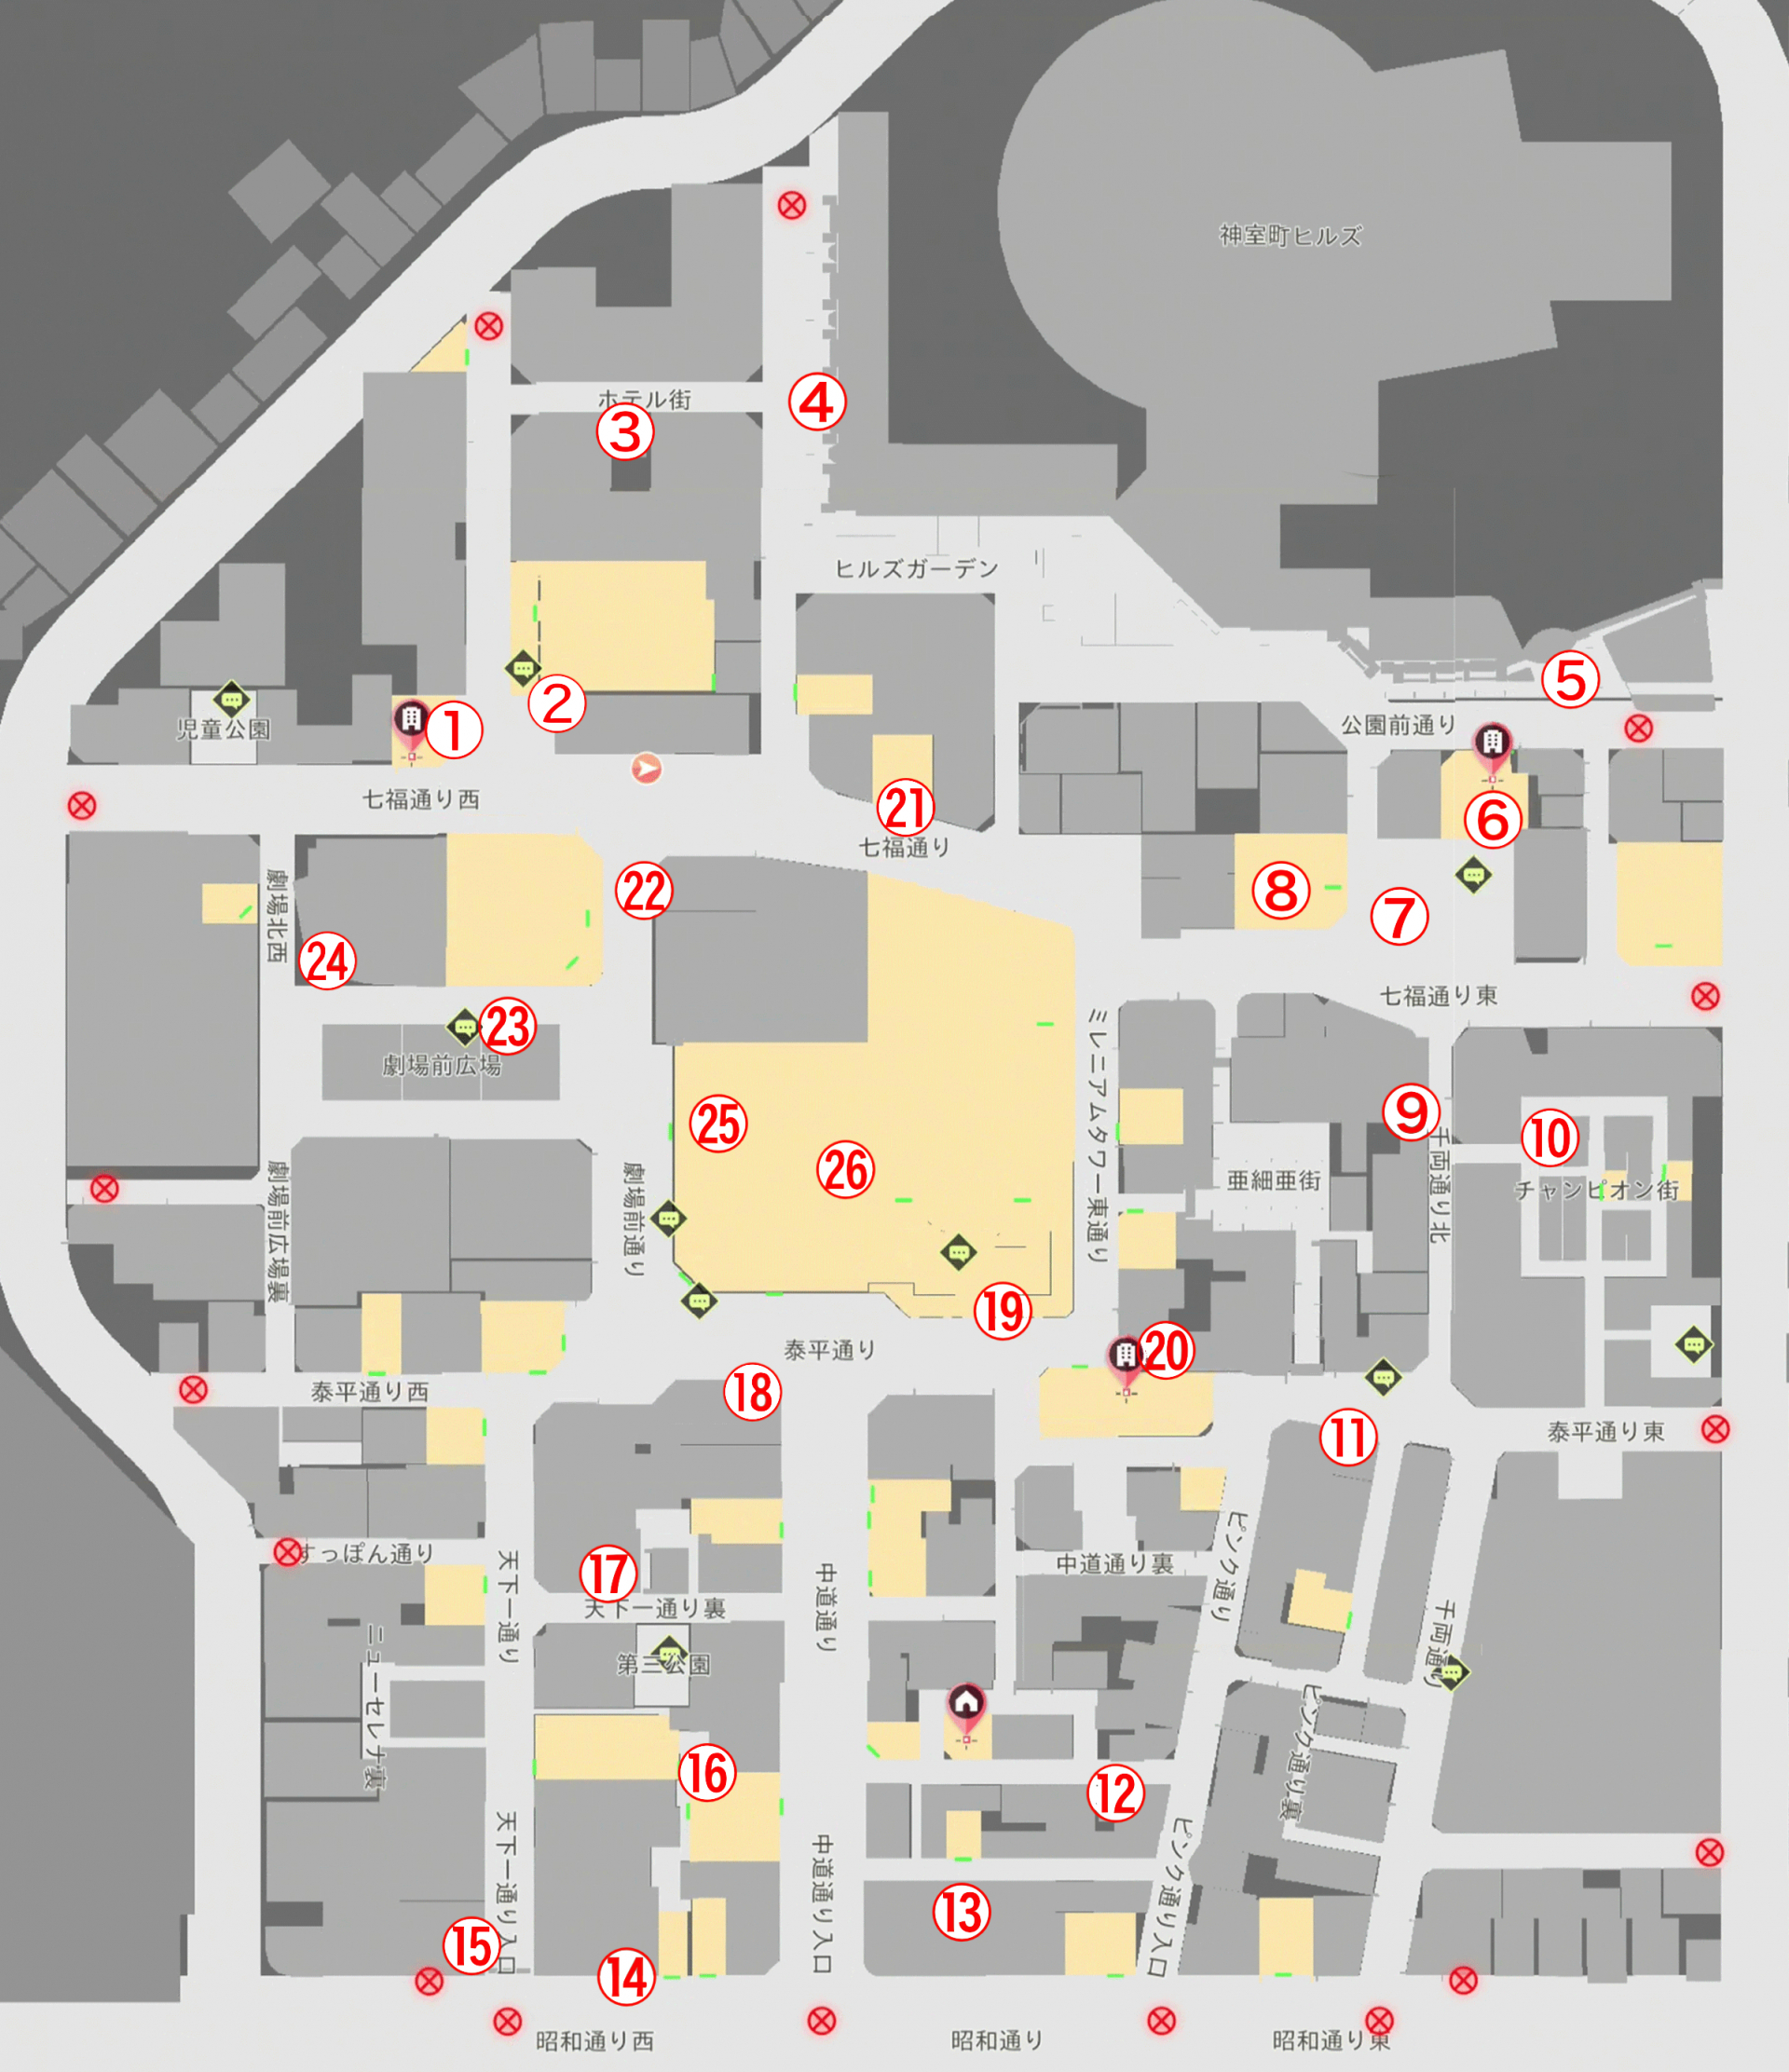
54 Side Cases split between Yokohama Ijincho and Kamurocho. Cases No.43+ require the Detective's Essentials Pack DLC. Once Chapter 3 unlocks the Buzz Researcher, you can pull jobs from the boards (Yagami Detective Agency in Kamurocho / Yokohama 99 in Ijincho). Side Case rewards feed directly into SP and School Story stats — run them alongside the main story.
#01Skateboard Detective vs. Resellers
▼
Ijincho — Yokohama 99
Trigger: Auto-triggered during the main story.
A tutorial case. Chase down sneaker scalpers on skateboard, learning the parkour-pursuit controls and Kaito's tag-team mechanic.
RewardSP + School Story 'Skateboarding' progression flag
#02The Man on the Ledge
▼
Ijincho — Yokohama Odori apartment
Trigger: Auto-triggered during the main story.
Yagami talks down a man threatening to jump from a rooftop. Pick the empathic line so he steps back from the edge.
Choices
Q. 'Why are you doing this?'A. Hear him out
RewardSP
#03The Robber in the Café
▼
Kamurocho — Tenkaichi St.
Trigger: Approach Romance Café on Tenkaichi St.
A bank robber is hiding among the café customers. Use Observation mode to pick the suspect, then take him down.
Choices
Q. 'Who's the suspicious one?'A. The sweating man clutching a bag
RewardSP + Detective Sight progression flag
#04Even Ebisu Won't Take a Fourth
▼
Seiryo High — 3F
Trigger: Triggered in the 3rd-year corridor.
RewardSP + School stat
#05Whereabouts of the Time Capsule
▼
Seiryo High — Outside grounds
Trigger: Talk to the trio of men outside the school.
Old alumni can't find the time capsule they buried. Yagami digs around the school grounds and recovers it.
RewardSP + memorabilia photo
#06Whereabouts of the Kappa
▼
Ijincho — Sakuragawa St. North
Trigger: Cut into the conversation between the suit and the drunk.
RewardSP + Kappa goods
#07Onward, Seiryo High Occult Club!
▼
Seiryo High — front gate
Trigger: Talk to the male student at the school's front gate.
The Occult Club kid asks Yagami to investigate the school's seven mysteries. Triggers the human-model and Amazawa Curse follow-ups.
RewardSP
#08The Invisible Thief
▼
Kamurocho — Senryo Ave.
Trigger: Tag the Buzz Researcher word 'Stalker' and investigate.
Stake out a shop where items keep vanishing. Use the camera-tail mechanic to chase the culprit through the back alleys.
RewardSP + Tailing skill boost
#09The Wandering Anatomy Model
▼
Seiryo High — 1F
Trigger: Investigate the 'Anatomy Model' Buzz word at night.
A school ghost story about a moving anatomy model. Stake out the science room and bust the pranksters behind it.
RewardSP + School stat bump
#10Ryan's Ninjutsu Class is Born!
▼
Kamurocho — M SIDE CAFE
Trigger: Pick up the request from the Yagami Detective Agency board.
Help foreign ninja-fanboy Ryan stage a convincing ninja act — handle the action shoot and the crowd reaction.
RewardSP + Ninja costume part
#11The Forbidden Flavor
▼
Ijincho — Moubu Hanten
Trigger: Pick up the request from the Yokohama 99 board.
A Chinatown restaurant's secret recipe is leaking. Compare tastings and statements to expose the thief.
RewardSP + recipe unlock
#12VR Salon: Paradise!
▼
Ijincho — outside VR Salon Paradise
Trigger: Sugiura brings the VR Salon job.
Star in a promo for a brand-new VR salon. Clear the cringe-acting mini-prompt; rolls straight into Case No.13.
RewardSP + VR Salon free pass
#13VR Salon: Paradise! 2
▼
Ijincho — outside VR Salon Paradise
Trigger: After clearing Case 12, approach Tashiro outside the salon.
Fallout from Case 12 — defend the manager against fraud allegations in a courtroom-style grilling.
RewardSP + extra VR Salon missions
#14Ijincho Drone Race Opens!
▼
Ijincho — Drone Race arena
Trigger: Triggered at the Drone Race arena.
Intro for the Drone Race minigame. Clear the first track to unlock the full circuit.
RewardSP + drone parts
#15Hermit Iyama's Calamity
▼
Ijincho — Isezaki Road
Trigger: Auto-triggered during the main story.
Eccentric 'hermit' Iyama is in trouble. Help him out — leads into Case 16.
RewardSP + Iyama's Elixir recovery item
#16Hermit Iyama: Origin Hunt
▼
Ijincho — Chinatown, Iyama's Elixir Shop
Trigger: After clearing Case 15, talk to Iyama.
RewardSP + Elixir shop discount
#17A New Partner?
▼
Ijincho — Yokohama 99
Trigger: Auto-triggered during the main story.
RewardSP
#18Masked Novelist Jumonji's Crisis
▼
Kamurocho — Tenkaichi-dori Bldg 1, 3F
Trigger: Accept the job from the Yokohama 99 board.
RewardSP + signed novel
#19The Runaway Game Creator
▼
Ijincho — Vette Kitchen
Trigger: Accept the job from the Yokohama 99 board.
RewardSP
#20The Storm-Calling Location Test
▼
Ijincho — outside Industry Hall
Trigger: After clearing Case 19, take the follow-up job.
RewardSP + arcade test coin
#21Radio Wave Detective: Intro
▼
Ijincho — Bayside St.
Trigger: Auto-triggered during the main story.
Hands you the radio detector. Unlocks the Radio Wave Detective chain (Cases 22–30).
RewardRadio detector + SP
#22Radio Wave Detective: The Wandering Bug
▼
Ijincho — Isezaki Road
Trigger: After Case 21, scan the woman in red.
RewardSP
#23Radio Wave Detective: Catch My Love
▼
Ijincho — Game Center Sasaki
Trigger: After Case 22, scan the crane-game plush.
RewardSP + plushie
#24Radio Wave Detective: Before the Light Fades
▼
Ijincho — near the Central St. Hello Work
Trigger: After Case 23, scan the drone.
RewardSP
#25Radio Wave Detective: The Wallet Was Listening
▼
Ijincho — outside Girl's Bite
Trigger: After Case 24, scan the wallet.
RewardSP
#26Radio Wave Detective: Seiryo Targeted
▼
Ijincho — Seiryo High
Trigger: After Case 25, scan the door.
RewardSP
#27Radio Wave Detective: From the Dark Below
▼
Ijincho — near Tsurukame Bridge
Trigger: After Case 26, scan the manhole.
RewardSP
#28Radio Wave Detective: The Hidden Flavor
▼
Ijincho — Bayside St.
Trigger: After Case 27, scan the ramen bowl.
RewardSP
#29Radio Wave Detective: The Final Vanishing
▼
Ijincho — Fukutoku Park
Trigger: After Case 28, investigate Buzz word 'Night Flight'.
RewardSP
#30Radio Wave Detective: Resolution
▼
Ijincho — Fukutoku Park
Trigger: Auto-triggers after Case 29.
RewardSP + Radio Detective title
#31That Painting on My Mind
▼
Ijincho — near Seiryo High entrance
Trigger: Talk to the girl beside the squirrel mural.
RewardSP
#32The Last Picture
▼
Ijincho — Fukutoku Park
Trigger: Clear all 55 Paint Search spots.
RewardSP + photo album complete
#33The Amazawa Family Curse
▼
Ijincho — Seiryo High Mystery Club room
Trigger: Speak to Amazawa in the Mystery Club room in the evening.
RewardSP + Mystery Club School reward
#34First Errand
▼
Ijincho — Yokohama 99
Trigger: Accept the job from the Yokohama 99 board.
RewardSP
#35Haruko's Story
▼
Ijincho — Girl's Bite
Trigger: While progressing the Girls Bar School Story.
RewardSP + Girl's Bite affinity
#36Miu's Story
▼
Ijincho — Girl's Bite
Trigger: While progressing the Girls Bar School Story.
RewardSP + Girl's Bite affinity
#37Ayaha's Story
▼
Ijincho — Girl's Bite
Trigger: While progressing the Girls Bar School Story.
RewardSP + Girl's Bite affinity
#38Step by Step — Part 1
▼
Ijincho — Kamiuchi Sta. East
Trigger: After clearing the Girls Bar School Story, raise Emily's affinity to 2.
RewardSP
#39Step by Step — Part 2
▼
Ijincho — Kamiuchi Sta. East
Trigger: Raise Emily's affinity to 3.
RewardSP
#40Step by Step — Part 3
▼
Ijincho — Kamiuchi Sta. East
Trigger: Raise Emily's affinity to 4 (night only).
RewardSP + Emily route ending
#41Yagami the Crooked Detective?
▼
Kamurocho — outside Yagami Detective Agency
Trigger: Clear every School Story.
RewardSP + School completion title
#42The Final Request — Returns
▼
Ijincho — Hamakita Park
Trigger: Clear every Side Case from No.1 to No.41.
RewardSP + Completion trophy
#43Why I Wear the Mascot Suit
▼
Kamurocho — Children's Park
Trigger: Investigate Buzz word 'Mascot' (DLC required).
Trigger: Progress the Biker School Story and clear Case 43 (DLC).
RewardSP + Pervert quartet completion
#52As the Months Turn — Part 1
▼
Ijincho — Kissa Pocket
Trigger: Raise Tsukino Saotome's affinity (DLC).
RewardSP
#53As the Months Turn — Part 2
▼
Ijincho — Kissa Pocket
Trigger: Raise Tsukino's affinity to 2 (DLC).
RewardSP
#54As the Months Turn — Part 3
▼
Ijincho — Kissa Pocket
Trigger: Raise Tsukino's affinity to 3 (DLC).
RewardSP + Tsukino route ending
Collectibles
1 categories
Region-by-region collectibles and side-mission rewards grouped by category.
Paint Search — 56 Squirrel Tags
After unlocking Paint Search at the Daidoji Hideout, collect all 26 squirrel tags in Kamurocho and 30 in Isezaki Ijincho. All four gadgets (mic, drone, radio detector, detective dog) are required.
56▼
Rewards include paints, plates, inner wear, skill books, and gems. Combine with outfit/item cleanup.
Each region map marks squirrel-tag locations by number; map numbers match the card numbers.
Click a red dot on the map for details. Collected dots show a green check.
Lost Judgment is set across Kamurocho and Yokohama (Isezaki Ijincho), and on top of the usual side activities it adds a huge block of Seiryo High 'School Stories' minigames — dance, boxing, robotics, a biker death race, skateboarding, VR and photography. Beyond school there are drone races, the 'Dice & Cube' board game at Paradise VR, the Club SEGA arcade, a secret casino and a gambling hall (mahjong, shogi, koi-koi, oicho-kabu), plus darts. For completion the School Stories rhythm/combat content is the biggest wall, so learn the locations and patterns first.
Story / Hub
School Stories
Difficulty
Seiryo High in Yokohama — accessed through the undercover investigation side case, which opens up the school clubs (dance, boxing, robotics, biker, skate, photography, VR, eSports)
A massive side-content hub where, while investigating undercover, you revive and probe Seiryo High's various clubs. Each club is its own minigame, and clearing them all is required for 100% completion — the centerpiece and biggest grind of the game.
Clubs unlock in sequence — progress Dance and Robotics first to meet the stat requirements (e.g. Focus level) that gate the other clubs.
Each club minigame is independent — clear the ones you're confident in first, and drop the difficulty for the rhythm/combat clubs if those aren't your strength.
Textbooks and rewards from club progress also feed Yagami's skills and stats, so it's efficient to advance them alongside the main story.
Music / Rhythm
Dance Club (Rhythm)
Difficulty
The Dance Club Room in the Seiryo High basement (the 'Dance Club' School Story)
A rhythm minigame where you hit on-screen button prompts in time with the music, chaining combos for a high score. The 100% trophy demands a Full Combo, making it one of the game's hardest activities.
Input exactly as each note reaches the judgment line — clearing the story is fine on Easy, so save Full Combo attempts until you've memorized the chart.
Simultaneous (multi-button) and slide notes are the tricky parts — pre-plan your finger placement and keep your eyes on the whole lane.
The Full Combo trophy can target both the boys' and girls' charts, so grind your Full Combo feel on the easiest song first.
Combat / Sports
Boxing (Todoroki Boxing Gym)
Difficulty
Todoroki Boxing Gym near Sunrise Bridge (the 'Boxing Gym' School Story); unlocks after Focus Lv. 2
A boxing sparring minigame that plays like a 3D fighter — each face button throws a different punch, and you block high/low and move to whittle down opponents' health, beating a ladder of boxers in turn.
A stamina gauge stops you from spamming punches — block to ride out the opponent's attacks, then counter into combinations in the openings.
Watch the opponent's guard height and mix body (low) and head (high) shots to break it down.
Later opponents (e.g. Wakita) hit harder — don't rush; prioritize dodging and stamina management over trading blows.
When the opponent's body glows red it's the tell for an uppercut — don't try to block it, dodge and then counter into the opening.
Strategy / Combat
Robotics Club (Robot Battle)
Difficulty
The Seiryo High Robotics Club room (the 'Robotics Club' School Story)
A minigame where you battle other teams in scrimmages using a robot you build and upgrade. As you progress, parts and abilities escalate until you're winning nearly every fight. It's the most involved of the School Stories.
Keep upgrading your robot with parts won from battles — balancing weapons, armor and mobility gives consistent wins.
Adjust your build to each opponent's weakness (ranged vs melee); early on, grow your stats before pushing hard.
Control is real-time, so spacing and attack timing matter — refighting early opponents with a late-game build makes part farming easy.
You can win on territory when time runs out, but the fastest win is capturing the enemy base — lay blocks to carve the shortest path to their base and seize it.
Racing
Biker Death Race
Difficulty
The 'Biker Gang' School Story investigation — its motorcycle race events
A motorcycle racing minigame within the biker gang investigation. There are 12 races total, each tougher than the last, decided by cornering and boost management.
Brake just before corners and cut the inside line to keep your path short — full-throttle cornering leads to crashes.
Save boost for straights, and use contact/clashes with rival riders to steal positions.
Later races require memorizing the course — run the hard ones once just to learn the track, then chase the result.
The boost meter fills slowly on its own, but pops up much faster if you wheelie on straights or drift through curves (lean left/right while inputting) — only ever wheelie on straightaways.
Sports
Skateboarding (TownGo)
Difficulty
City traversal and skate parks via the TownGo app (the 'Skaters' School Story) — parks and races around Yokohama
Skate around the city, landing tricks off ramps to score. Each park has a clear goal plus a tougher secondary goal for the TownGo award, and there are skate races too.
Hit jump in time as you reach the ramp, then mash the button in the air to land the trick — higher combos score far more.
The TownGo secondary goal needs fast, back-to-back tricks in a short window, so chain combos through ramp-dense areas without dropping them.
Missing the landing timing breaks the combo — repeating tricks you can reliably land scores more steadily than overreaching.
Grab every coin between tricks to push the combo to 10x — the game then spawns gold coins worth far more than silver ones; if you're stuck, just ride back and forth between two ramps/pipes to keep the combo alive.
Racing
Drone Racing
Difficulty
The Drone Race booth on the soccer field in the northwest corner of Ijincho, next to the batting center
Race a drone you've built through aerial courses, in Single Races and a multi-course Grand Prix. Clearing all leagues and time trials is the completion task.
Upgrade your drone's speed, acceleration and durability with parts — higher leagues are very hard without investment.
Passing through rings/gates cleanly builds boost — ease off before corners to hold your line, then dump boost on the straights.
In time trials every collision costs your record, so nail a safe line first, then sharpen it aggressively.
Recommended build: within the 250-cost limit, run an S-ONE Adamant Frame (any color) with the MTG Motor, the Low-Cost Turbo, and the S-ONE: S3 Propeller (best speed stat at 25) — almost no course needs durability, so dump everything into speed.
Board
Dice & Cube (VR Sugoroku)
Difficulty
Paradise VR (unlocked via a side case from Chapter 3 on); the only currency accepted is the Play Pass
A sugoroku board game where you yourself are the piece. Roll a die to move, resolve each space's event (gift, battle, drone, parkour, lockpicking), and win by reaching the goal first. Beating strong rivals permanently teaches you their skills.
You choose your direction, so plan your path to step on blue (gift/star-plus) spaces and avoid red (star-minus/battle) ones.
Yellow-space minigames (drone, parkour, lockpicking) are short action bits — handle them calmly for stars and items.
Even low courses net hundreds of thousands of yen per run (millions on hard courses), so it's great for money — collecting rival skills makes later runs easier.
Arcade
Club SEGA Arcade
Difficulty
Club SEGA in Kamurocho and Ijincho (plus Master System games in Yagami's office) — Sonic the Fighters, Motor Raid, Fighting Vipers, Space Harrier, Fantasy Zone, Super Hang-On, Virtua Fighter 5 and more
A collection of classic SEGA arcade titles in Club SEGA. You can play 1980s–90s arcade hits and Master System games, and playing every arcade game at least once is a completion task.
Completion only wants you to 'play' each game, so it's about running every cabinet once for the record — not high scores.
Sonic the Fighters, Fighting Vipers and Virtua Fighter 5 are fighters — a single CPU match each is enough.
The Master System games in Yagami's office can switch between Western and Japanese versions — check both if they're tracked separately.
Yokohama — Citron Mahjong (lower tier) in the basement on Sakura Lane in Koreatown, and Vista Mahjong (top tier) near the taxi stand in north Chinatown
Standard Japanese riichi mahjong — the series' biggest wall if you don't know the rules, but learning one winning pattern is enough for completion.
Keep your hand fully closed (never call Pon/Chi) so you can declare Riichi.
Chase Tanyao (only simples 2–8); when you're one tile from 4 sets + a pair, declare Riichi and a yaku attaches automatically.
Completion only needs wins, not big hands — prioritize fast wins over value.
Board
Shogi
Difficulty
Open Air Shogi near the Homeless Camp in Yokohama, where the locals play
Japanese chess; the key twist vs. Western chess is that captured pieces can be dropped back onto the board.
Build a castle (gakoi) around your king first — Mino castle is the easiest starter.
Captured pieces can be dropped anywhere — parachute them deep into enemy territory to apply pressure.
Completion just needs wins, so a safe formation that limits mistakes beats over-aggressive attacks.
Gambling
Gambling Hall (Koi-Koi & Oicho-Kabu)
Difficulty
The secret Gambling Hall in a back alley in the southeast of Yokohama's Red Light District (door code 7120) — koi-koi and oicho-kabu
A secret gambling den for hanafuda-based koi-koi and oicho-kabu. You need the door code (7120) to get in.
Koi-Koi: match same-month cards to build yaku (scoring combos); bank even small yaku immediately for safety.
When you complete a yaku, choose to call 'Koi-Koi' to keep building or stop — if the opponent looks close to a big yaku, lock your points in.
Oicho-kabu: the closer your cards' total last digit is to 9, the stronger — gambling cheat items make the completion grind much easier.
Gambling
Secret Casino (Poker & Blackjack)
Difficulty
The secret Casino inside the restrooms at the west end of Chinatown (unlocked via the Casino School Story) — poker and blackjack
A secret casino offering poker and blackjack, accessible by progressing the Casino School Story.
In blackjack, follow basic strategy — stand on 17+, and only push when the dealer's up-card is weak.
In poker, concentrate your bets on strong hands rather than over-bluffing; chip rewards feed completion and item exchange.
Gambling cheat items let you bank big chip totals reliably.
Bar games
Darts
Difficulty
The Bee, a bar near Jinnai Station in Yokohama, with a dartboard
A bar darts minigame with rules like 01, Cricket and Count Up, where aim accuracy and gauge timing decide your score.
Stop the wobbling reticle on the center (high score), then stop the accuracy gauge in the yellow zone.
In Cricket you must 'capture' each of 15–20 and the Bull with 3 marks — focus on closing one number at a time.
Count Up is pure point totals and good for practice — farm easy opponents for the wins toward completion.
If you only need to clear a song, equip the 'Freestyle A' EX Solo — the Groove (QUALITY) gauge fills faster even when you miss notes, making songs much easier to survive.
When chasing high scores or perfects, use the 'Freestyle C' EX Solo instead — it converts Good hits to Perfect and lengthens the gauge.
The EX choreography sections that trigger mid-song have looser timing and grant lots of gauge — bank gauge there to ride through the dense, hard sections.
Dance Full Combo (Girls) - 100% Trophy GuideDance Club side story full walkthrough
The two core tactics are guard-then-counter and dodge-then-counter; against erratic boxers like Mikimoto, default to dodging rather than blocking.
The moment an opponent's combo ends is your best counter window — fully drain their stamina, then finish with a heavy like the EX Piercing Straight.
Boxing Gym - all 3rd-row opponents (vs Wakita)
For your main Deus, run an XF chassis + top battery + Balanced Motor H, an Eagle Sniper with an extra-ammo module, and a Stealth Chip to reduce how often you're targeted — a better battery raises the cost limit so you can fit stronger parts.
Dedicate one AI helper to block-collecting on an MB chassis + Speed Motor build (move-speed chip) while you snipe enemies down with the main unit — this stabilizes the base fight.
Early on, clear the rival crew first with boosts or rams — time and angle a boost well and you can wipe out two or three riders at once.
Final-race trick: tuck in behind the last opponent, build boost to max (up to 3 stocks once upgraded) with wheelies/drifts, then spam boost in the last few hundred meters to blow past — bike upgrades raise your boost stock, so they're worth the money.
In parks with rails, grinding them as you pass bumps the multiplier higher — pick a high-acceleration board so you reach ramp speed fast.
In skate races, get ahead early and hit every jump to keep boosting, topping up speed with rail grinds and pickups along the way.
TownGo skateboarding school mission completed
If you own the Detective Essentials Pack DLC you automatically get the Sky Spider frame, which has the capacity to fit all top-tier parts without worrying about the cost limit.
Grand Prix runs several courses at two laps each, so quit out and save after every race — if you fail a later race you won't have to re-run the ones you already cleared.
Drone Racing - 100% Trophy GuideDrone Racing Championships - all races & time trials
Expect roughly 250,000–450,000 yen per run on low courses, and up to millions on a lucky long/hard run — courses unlock in order: Short → Middle → Long (Standard/Challenge rules).
The Play Passes you need to enter come from buying Lucky Bonus items at restaurants — take the Lucky Gourmand and Bottomless Stomach skills first to improve the odds, and returning Lost Items can also reward Passes.
On VR Athletic spaces, climbing higher within the time limit pays more; and since rivals reaching the goal first ends the run, plan your route to stay ahead of them above all.