Chapter-aligned list of substories, trophies, and choices to pick up while progressing.
CH 7The Dragon and the Koi
MISSABLE
'Searching for the Present' — Haruka-only substory
While Haruka tags along in Ch.7
With Haruka in tow, find the girl at Children's Park, then collect a gift from at least three of the four spots: Poppo on Showa St., the Tenkaichi back alley, Club SEGA Theater Square, and the Pocket Circuit Stadium. Haruka only walks with you in Ch.7 and Ch.11 — miss both and the substory is gone.
CH 11A Reunion
MISSABLE
Last window for Haruka-walks-with-you substories
During Chapter 11
Chapter 11 is the final stretch where Haruka actually walks with Kiryu in the main story. Anything you skipped in Ch.7 (Hide-and-Seek, Searching for the Present, etc.) must be cleared now — Chapter 12 locks them out of the 100% list for good.
Substories
78 entries
78 'Trouble Mission' substories spread across Kamurocho. None are time-limited — every one stays accessible up to the final boss — but a handful punish wrong dialog picks with broken rewards. Chapter 4 unlocks ~35 at once, so interleave them with the main story rather than backlogging. The Komaki training chain (57–67) feeds Kiryu's signature Heat Actions and should be prioritized.
#01The Price of an F-cup
▼
Pink St. North
Trigger: Approach the man yelling about busty models on Pink St. North.
A casting-scam hustler demands a fake fee. Refuse, beat him down, and the encounter unlocks the underground casino lead.
Choices
Q. 'Just pay the 50,000 yen fee…'A. Refuse
RewardEXP + underground casino lead
#02My Baby's a Show Girl
▼
Asia Gentleman's Club
Trigger: Talk to the young man outside the club.
Help him retrieve his showgirl girlfriend from the club.
RewardEXP
#03Bet On a Champ
▼
Bantam bar
Trigger: Hear the Bantam master out.
Bust a fixed boxing match — a boss-tier fight.
RewardLarge cash prize
#04The Yakuza's Wife
▼
Purgatory's Red-Light District
Trigger: Talk to the woman in Purgatory's red-light district.
Help a yakuza widow settle a debt with her husband's old crew.
RewardBig EXP
#05A Doctor's Duty
▼
West Park entrance
Trigger: Find the collapsed man at West Park entrance.
Drag him to the clinic and force the reluctant doctor to do his job.
RewardEXP
#06The Fake Mizuki's Truth
▼
Purgatory Red-Light District
Trigger: Pick up the fake Mizuki lead in Purgatory during Chapter 13.
Run down the truth behind the fake-Mizuki scheme; multiple fights.
RewardBig EXP
#07Man on a Ledge
▼
Park Boulevard
Trigger: Spot a man about to jump from a ledge.
Talk him down with sincere replies. A single sarcastic pick breaks the branch.
Choices
Q. 'What's wrong?'A. Listen seriously
Q. 'What will you say?'A. Empathize
RewardEXP + accessory
#08Molestation Accusation
▼
Theater Square
Trigger: Walk past the salaryman being accused on Theater Square during Chapter 2.
A woman frames an innocent salaryman as a groper to extort him. Hear both sides, then side with the man — she reveals herself as a scammer with backup; beat them to clear. Siding with her cuts the reward.
Choices
Q. 'Whose side are you on?'A. Side with the manPicking the woman tanks the reward.
RewardEXP + completion credit
#09The Stalker
▼
Nakamichi Alley — east
Trigger: Talk to the woman complaining about her stalker.
Track and beat the stalker — note the twist in the dialog branches.
RewardEXP
#10Dine and Dash
▼
Tenkaichi St. — north
Trigger: Meet the shop owner chasing a dine-and-dash customer.
Chase down the runner and beat him; pick the correct alley fork or he escapes.
RewardEXP + meal voucher
#11The Price of a Palm Reading
▼
Senryu St.
Trigger: Talk to the fortune teller on Senryu St.
The fortune teller stacks fee after fee. Pay the first 1,000 yen, then refuse from the second prompt onward to clear cleanly.
Choices
Q. 'Just 1,000 yen…'A. Pay
Q. 'A bit more…'A. RefuseRefuse every prompt after the first.
RewardEXP + lucky charm
#12The Toll Collector
▼
Park Blvd. / Shichifuku St. connector
Trigger: Approach the giant blocking the connector and demanding a toll.
Refuse to pay and beat him down.
RewardEXP
#13Pay It Forward
▼
Third Park
Trigger: Hand the homeless man at Third Park some cash.
Come back later; the homeless man repays many times over.
RewardLarge cash reward
#14The Yakuza Hater
▼
Park near Pocket Circuit Stadium
Trigger: Talk to the man at the park.
A yakuza-hater challenges Kiryu. Win and he comes around.
RewardEXP
#15The Bouncer
▼
Showa St. (between Pink & Nakamichi)
Trigger: Hostess on Showa St. asks Kiryu for protection.
Drive off the stalker harassing her.
RewardEXP
#16Collection Call
▼
Vincent bar on Park Blvd.
Trigger: Talk to the man fielding a brutal collection call outside Vincent.
Take the call, scare the collector off, then beat the goons who show up.
RewardEXP
#17Bump and Scam
▼
Nanafuku St. north of Theater Ave.
Trigger: Bump into the man picking a fight on Nanafuku St.
A staged-bump scammer demands payout. Refuse and beat him; apologizing only escalates the shakedown.
Choices
Q. 'Pay my medical bill!'A. Refuse
RewardEXP
#18Bump and Scam: Revenge
▼
Nanafuku St. (same spot)
Trigger: Return to the same Nanafuku St. corner after clearing #17.
Same scammer returns with a friend. Refuse, fight, repeat — this is part two of a four-part chain.
RewardEXP
#19Bump and Scam: Three Strikes
▼
Nanafuku St. (same spot)
Trigger: Return after clearing #18.
The scammer escalates with more thugs. Refuse and fight.
RewardEXP
#20Bump and Scam: Epilogue
▼
Nanafuku St. (same spot)
Trigger: Return after clearing #19.
Final round. Refuse, win, and the scammer swears off the grift.
RewardBig EXP payout
#21Con-tacts
▼
Pawn shop road — east side
Trigger: Talk to the man searching the pavement for a contact lens.
He asks Kiryu to help find a 'lost' contact. It turns out to be an insurance-fraud setup; his accomplices appear — beat them all.
Choices
Q. 'Help me look'A. Help himRefusing ends the substory with no reward.
RewardEXP
#22The Little Match Girl
▼
Pink St. / Senryu St. southern edge
Trigger: Talk to the girl selling matches.
Buy matches, return later for a touching reveal.
RewardEXP + accessory
#23The Crane Game
▼
Club Sega — Nakamichi St.
Trigger: Talk to the couple at the crane game inside Club Sega.
Win one plush for the boyfriend using the crane game.
RewardEXP + plush item
#24Prodigal Son
▼
Street east of MEB block
Trigger: Talk to the elderly couple.
Hunt down their delinquent son across Kamurocho and put him in his place.
RewardEXP
#25Bowling Battle
▼
Mach Bowl
Trigger: Challenge the self-styled former pro at Mach Bowl.
Win the bowling match by a comfortable margin.
RewardEXP + bowling reward
#26The Drunkard
▼
Tenkaichi St. (near Serena)
Trigger: Talk to the collapsed drunk.
Wake the drunk by dousing him with water — the other options just waste a turn.
Choices
Q. How do you wake him?A. Splash water
RewardEXP
#27Handbag Hunt
▼
Taihei Blvd. — south
Trigger: Talk to the woman whose handbag was stolen.
Chase the thief, recover the bag.
RewardEXP
#28Under Suspicion
▼
Theater Square — south side
Trigger: Approach the man acting suspiciously.
He looks like a pickpocket but is actually looking for a lost contact. Help him out instead of accusing.
Choices
Q. 'What are you doing?'A. Hear him out
RewardEXP
#29The Heart of Vandalism
▼
Theater Square Alley — west
Trigger: Confront the graffiti tagger in the alley.
Beat the tagger and his crew.
RewardEXP
#30The Yakuza's Apprentice
▼
Senryu St. — east side
Trigger: Talk to the wannabe yakuza on Senryu St.
Part one of a four-part series in which Kiryu tries to scare him straight.
RewardEXP
#31The Yakuza's Apprentice II
▼
Yoshida Batting Center area
Trigger: Meet him again after #30.
Second test; the kid starts to waver.
RewardEXP
#32The Yakuza's Apprentice III
▼
Pink St. (north of Beam)
Trigger: Meet him again after #31.
Third test.
RewardEXP
#33The Yakuza's Apprentice IV
▼
Taihei St.
Trigger: Meet him again after #32.
Final chapter; the kid finds his own path.
RewardEXP + accessory
#34Man Scout
▼
Showa St. East
Trigger: Talk to the male scout.
A scout pitches Kiryu as a host. Refuse to trigger the fight.
Choices
Q. 'Want to host?'A. Refuse
RewardEXP
#35The Truth About Beauty
▼
Pharmacy area
Trigger: Talk to the woman outside the pharmacy.
A stunning beauty is in fact running a long con. Help once, then refuse her follow-up demand.
Choices
Q. 'Just one more favor…'A. Refuse
RewardEXP
#36Professional Brawler
▼
Parking lot (west Nanafuku St.)
Trigger: Accept the brawler's challenge in the parking lot.
1v1 duel. Win.
RewardEXP
#37Gangbusters
▼
Hotel District
Trigger: Meet the vigilante crew in the Hotel District.
Brawl through a wave of street gangs.
RewardBig EXP
#38Pickpocket Pursuit
▼
Nanafuku St. — north of Millennium Tower
Trigger: Talk to the pickpocket victim.
Catch the runner and beat him.
RewardEXP
#39Kyoka and Takashi
▼
Park Blvd.
Trigger: Talk to the couple on Park Blvd.
Help Takashi finally propose to Kyoka.
RewardEXP
#40The Medicine Goes Down
▼
Senryo St. — south
Trigger: Talk to the man collapsed on Senryo St.
Buy the requested medicine at a convenience store and hand it over.
RewardEXP
#41The B-King's Misfortune
▼
Theater Square
Trigger: Talk to the self-styled B-list star on Theater Sq.
Run off the haters harassing him.
RewardEXP
#42The Cell Phone Plan
▼
Tenkaichi Alley
Trigger: Pick up the dropped phone in Tenkaichi Alley.
Meet the owner — it's a setup; beat the ambush.
RewardEXP
#43Yakuza on the Run
▼
Nakamichi Alley — west
Trigger: Talk to the fleeing yakuza in Nakamichi Alley.
Take out the men chasing him.
RewardEXP
#44Bad Boy in Blue
▼
Pink Alley — middle section
Trigger: Spot the fake cop extorting passersby.
A fake cop tries to fine Kiryu. Refuse and fight — paying lets him win.
Choices
Q. 'Pay the fine'A. Refuse
RewardEXP
#45Of Luck and Debt
▼
Shellac bar / underground casino
Trigger: Hear the Shellac master out, then follow the casino tip.
Track a missing debtor into the underground casino — this is also how you unlock casino access.
RewardEXP + permanent casino access
#46The Last Assassin
▼
Theater Square
Trigger: Final entry of the assassin chain.
Climactic duel with the final assassin — a top-tier reward fight.
RewardTop-tier gear + big EXP
#47Crisis on the Crapper
▼
Park near Pocket Circuit Stadium
Trigger: Talk to the man hopping near the park toilet.
He needs toilet paper — give him a pack (buy from a Poppo if you lack one).
Choices
Q. 'Got tissue?'A. Give tissue
RewardEXP + accessory
#48Memories of the Bubble
▼
Debolah dance club
Trigger: Speak to the lady standing at the side of Debolah's lower dance floor.
Agree to help her and answer "We waved 10,000 yen bills", "Leg Lads", and "A bodycon dress and a fan". Buy one of each at Don Quijote (they are not cheap), return to Debolah and hand them over.
RewardEXP + disco gear
#49The Rumored Party
▼
Stardust → Debolah
Trigger: Speak to the host near the door inside Stardust.
Hear out Kazuki's problem about a "party" stealing his customers. Talk to the two women inside Stardust with talk prompts to learn you need Debolah; as you leave, a third woman invites you. Meet her in front of Debolah, then speak to everyone on the dance floor to uncover the guru behind it and defeat Munan Yazawa.
RewardTourmaline Bracelet
#50Searching for the Present
▼
Pocket Circuit Stadium area
Trigger: Talk to the man near the stadium.
Source his girlfriend's gift from a Kamurocho shop.
RewardEXP
#51Bad Ass Dads
▼
Purgatory fountain
Trigger: Talk to the group of dads in Purgatory.
A short brawl with middle-aged poseurs pretending to be tough.
RewardEXP
#52The Value of 2,000 Yen
▼
Vincent bar
Trigger: Hear about the rare 2,000-yen note at Vincent.
The man in glasses at Vincent's bar counter wants five 2,000 yen bills. You have to scour Kamurocho for them, and you can only carry one at a time — each has to be brought back to Vincent separately. The drunk at the Taihei/Pink crossroads simply hands one over. Delivering all five pays ¥100,000.
RewardEXP + cash reward
#53MesuKing: The Queen of Beetles
▼
Club Sega — Nakamichi St.
Trigger: Talk to the kid in front of the MesuKing cabinet.
Unlocks the MesuKing card-battler minigame — win the intro match.
RewardEXP + starter MesuKing cards
#54A Goodbye Promise
▼
JeweL
Trigger: Hostess outside JeweL asks for help.
Help her keep an old promise.
RewardEXP
#55Freedom to Romance
▼
Club Shine
Trigger: Talk to the hostess arguing with a customer outside Shine.
Force the stalker customer to back off.
RewardEXP
#56The Fighter's Successor
▼
Pocket Circuit Stadium
Trigger: Talk to the Fighter at the stadium.
Fully unlocks Pocket Circuit. Win the opening race.
RewardPocket Circuit kart parts
#57Behind the Assassin
▼
Taihei Blvd. West
Trigger: Continue the assassin questline.
Track and defeat one of the named assassins.
RewardBig EXP + weapon
#58In Pursuit of Pleasure
▼
Taihei Blvd. East
Trigger: Talk to the bored couple on East Taihei.
A bored couple looking to spice things up — a short comedic side-quest.
RewardEXP
#59Komaki Style: Shot Stopper
▼
Purgatory fountain
Trigger: First meet Master Komaki in Purgatory.
Counter a gunman before he fires.
RewardHeat Action unlock
#60Komaki Style: Swordsmanship
▼
Purgatory fountain
Trigger: After #59.
Bladed weapon handling.
RewardHeat Action unlock
#61Komaki Style: Roundhouse Attack
▼
Purgatory fountain
Trigger: After #60.
Multi-enemy spin attack.
RewardHeat Action unlock
#62Komaki Style: Cat-Like Reflexes
▼
Purgatory fountain
Trigger: After #61.
Air recovery technique.
RewardHeat Action unlock
#63Komaki Style: Clear-Minded Mastery
▼
Purgatory fountain
Trigger: Speak with Komaki at the fountain after prior training.
Dodge for the required duration without striking.
RewardHeat Action unlock
#64Komaki Style: Evade and Strike
▼
Purgatory fountain
Trigger: After #63.
Evade then immediate counter strike.
RewardHeat Action unlock
#65Komaki Style: Dharma Tumbler
▼
Purgatory fountain
Trigger: After #64.
Stand up while striking back.
RewardHeat Action unlock
#66Komaki Style: Fist Reversal
▼
Purgatory fountain
Trigger: After #65.
Bare-handed grab counter.
RewardHeat Action unlock
#67Komaki Style: Knock Back
▼
Purgatory fountain
Trigger: After #66.
Strike parry.
RewardHeat Action unlock
#68Komaki Style: Tiger Drop
▼
Purgatory fountain
Trigger: After #67.
Unlocks Tiger Drop — Kiryu's signature parry-counter. Time Triangle to the opponent's wind-up frame.
RewardTiger Drop ability
#69Komaki Style: Parry
▼
Purgatory fountain
Trigger: After #68.
Advanced guard parry.
RewardHeat Action unlock
#70Practice Match with Professor
▼
Club Sega — Nakamichi St.
Trigger: Challenge the Professor after #53.
Tutorial MesuKing match.
RewardMesuKing cards
#71First Rival
▼
Club Sega — Nakamichi St.
Trigger: A new MesuKing rival appears after prior matches.
Rival card battle.
RewardMesuKing cards
#72Private Lesson
▼
Club Sega — Nakamichi St.
Trigger: Return to the Professor after the rival match.
Extra coaching and a match.
RewardMesuKing cards
#73As Long as There's Love
▼
Club Sega — Nakamichi St.
Trigger: Continue the rival line.
A look into the rival's family drama.
RewardMesuKing cards
#74Time for a Raid!
▼
Club Sega — Theater Square
Trigger: Go to the Theater Square Club Sega after #72.
Take down a rival arcade's MesuKing king.
RewardMesuKing cards
#75The Professor's Past
▼
Club Sega
Trigger: Visit Club Sega once the Professor summons you in the MesuKing chain.
Hear the Professor's backstory and battle on.
RewardMesuKing cards
#76The Professor's Past 2
▼
Club Sega — Theater Square
Trigger: Continues from #75.
Second half of the Professor's backstory.
RewardMesuKing cards
#77Enjoying It With Everyone
▼
Club Sega — Nakamichi St.
Trigger: Return to Club Sega after progressing the MesuKing chain.
Tournament round in the MesuKing chain — win with a tuned deck.
RewardMesuKing cards
#78Battle for the MesuKing Throne
▼
Club Sega
Trigger: Final MesuKing match.
MesuKing championship — bring a full card collection.
RewardMesuKing champion title
Collectibles
1 categories
Region-by-region collectibles and side-mission rewards grouped by category.
Coin Lockers — Kamurocho's 50 Keys & Rewards
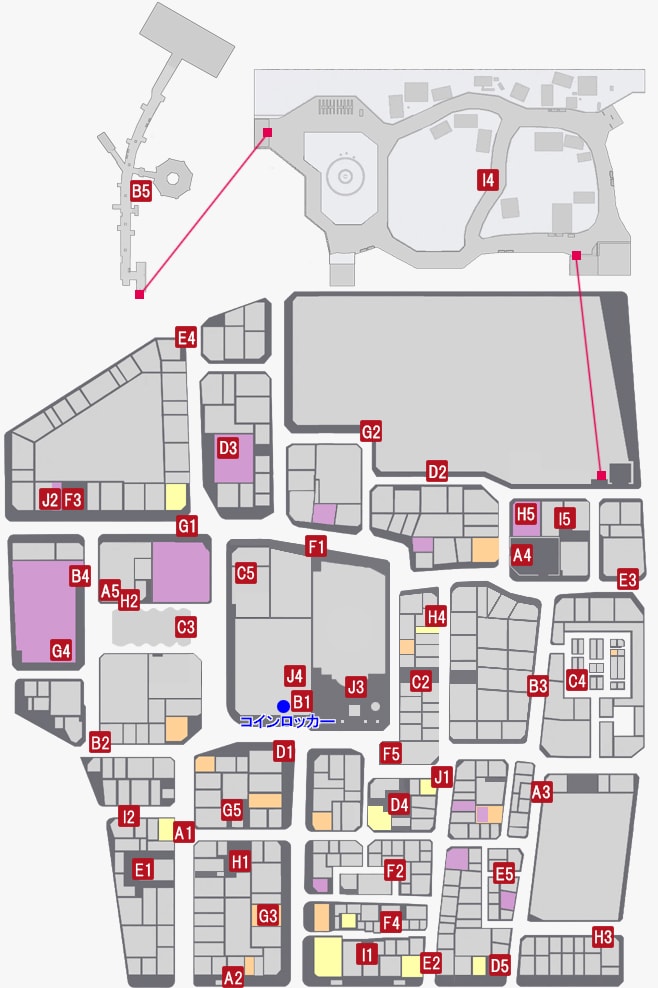
All 50 Kamurocho coin-locker keys with locations and contents. The lockers sit on Taihei Blvd. Map numbers match the card numbers.
50▼
Investigate shining spots on the ground for keys. Most become available from Chapter 4.
Click a red dot on the map for details. Collected dots show a green check.
Yakuza Kiwami keeps every minigame inside one Kamurocho, so the grind is concentrated. 'What a Player' wants a go at all of them, and Pocket Circuit and MesuKing carry their own trophies. The gambling rows stop being gambling once you have collected the cheat items out of the coin lockers.
Gambling / board
Mahjong
Difficulty
Mahjong Jansou, Kamurocho
Six completion rows, the longest set here: go out 10 times, five mangan, one haneman, one riichi ippatsu, one full straight, and 100,000 sticks banked.
The Lucky Tile cheat sits in Locker I2. It deals you Thirteen Orphans outright, which clears the haneman row and a big chunk of the points at once.
It cannot do riichi ippatsu, though — a yakuman like Thirteen Orphans overrides ippatsu and other minor yaku, so that row needs an ordinary hand.
Full straight wants 123, 456 and 789 in one suit. Only chase it when the deal already has five or more numbers of a suit, and only chi to complete one of those three runs — any other chi kills the yaku.
For the gear, Ranking Match costs a one-off ¥50,000 buy-in and is free afterwards: first place moves you up two ranks, second one, fourth drops you one — and quitting a bad game costs nothing.
Three rows: win without a take-back once, three times, five times. You do not need to know shogi — one item from Locker J3 covers all three.
The Give-Up Piece in Locker J3 makes the opponent resign instantly whenever you use it, and it counts as a win with no take-back — so it clears all three rows.
If you are farming shogi points, the Shogi Challenges are far faster than ranked games — set positions with a correct answer, over in moments.
From about Chapter 10 the prize list adds the Dragon Slayer at 100,000 points. Challenge 9 pays 1,150 a run, so that is 80-plus repeats — and it is not needed for 100% completion.
Gambling Hall (cho-han, cee-lo, koi-koi, oicho-kabu)
Difficulty
The gambling den in Underground Purgatory
Each of the four wants 10,000 banked. Pick the cheat items up first and it stops being gambling.
Cho-han uses Even Goro's Beads (Locker E4) and the Lopsided Cigarette (Locker F3). The beads force the very next roll even; the cigarette skews the other punters' bets to one side.
Cho-han starts capped at 100 tags and the ceiling climbs to 1,000 as you win — but it only updates when you leave and come back, so step out every five wins or so.
Save the beads for a direct bet against the house after the ceiling has risen — spending one at a 100-tag cap wastes it.
Rows are 20,000 in poker, 50,000 in blackjack, 20,000 in baccarat and 50,000 in roulette. Two blackjack cheats bankroll the rest of them.
The Blackjack Amulet is in Locker G3 and the Bust Amulet in G4. Sit at high stakes with 1,000+ chips and use the Bust Amulet first: the dealer busts five hands in a row.
It fizzles when the dealer stands on 17 from two cards, but five wins still pushes the bet ceiling to 10,000 — then the Blackjack Amulet gives five blackjacks in a row and the chips pile up.
Blackjack raises your cap on a streak: one win allows 300 low or 3,000 high, two wins 500 or 5,000, three or more 1,000 or 10,000 — and one loss resets it.
Completion is three combination shots and three carom shots. You never have to win a game, and Puzzle Pool is not required at all.
A carom is cue -> object ball -> another ball, and that other ball drops. A combination is cue -> object ball -> another ball, where the object ball did the hitting. Three of each.
Do not wait for these in a match: choose Play Alone and Nine-ball, nudge the balls into the shape you want, then scratch on purpose to place the cue ball wherever you like.
In Puzzle Pool touching a black ball fails the puzzle and the yellow balls are optional help — none of it counts for completion, so skip it if you are short on time.
One row: ten hat-tricks. A hat-trick is all three darts in the bull in a single round.
Start a 901 game alone: that is twenty rounds of aiming at nothing but the bull, at your own pace.
Aim with the left stick, pull the right stick down, release to throw. Pull slowly to about halfway rather than to the edge, then release quickly — that lands on target.
Do not pull back before you are on target: the hand wavers even with the stick still, so commit at the moment the aim is right.
Two rows: ten strikes, and five frames cleared across Split Games. The split side is the harder half.
Strikes come from the pocket — just beside the head pin. Hit it hard with a little spin and the odds jump.
Up/down picks the ball (light is controllable, heavy has power), left/right your stance, cross sets direction then power, and a gentle left-stick nudge during the approach adds spin — it is very sensitive, so barely move it.
Split Game gives ten pin combinations; each must go down in a single throw. You have a stock of three balls and every miss costs one.
Split Game prizes are all Pocket Circuit parts: three frames gives the Sunshine Decal, five the Extra Speed Frame, seven the Ultra Soft Tires.
Sports
Batting Center
Difficulty
Yoshida Batting Center, Kamurocho
Five rows: ten Two-Panel Knock-outs, and 1,600 points on each of Easy, Normal, Hard and Extra Hard.
1,600 is the A-rank line. Each course pays out at B (1,200), A (1,600) and S (1,800) — Extra Hard at S gives Toughness Infinity.
Pitch types and speeds are fixed per course, and Hard and Extra Hard use effectively the same twenty-pitch script — the timing you learn on Hard carries straight over.
Straights sit at 110-130 km/h, curves at 60-100 and sinkers at 70-110 — not rushing the slow curves is what protects the score.
Six songs, 900 or more on each. Three you sing yourself; three you back up with interjections.
Interjection songs offer Simple or Lively — you have to take Lively, because Simple cannot reach 900.
The three you sing are TONIGHT, Iji Sakura 2000 and Bakamitai -Sorrow-; the three you interject on are Otometal MY LIFE (Haruka), Moment de la Petite Sirene (Yui) and EURO de x3 SHINE (Rina).
Otometal MY LIFE only appears with Haruka along, and the other two need Yui and Rina — so the cabaret side has to be underway first.
Sung parts follow the lyrics, interjections follow the beat. Hold means hold to the end of the marker; Rapid means mash.
Arcade
UFO Catcher
Difficulty
Club SEGA, Kamurocho (¥300 a play)
Two rows: five and fifteen different prizes. There are sixteen plushes in total and every one can turn up at any location.
If the plush you need is not in the machine, ask the attendant to restock — the line-up is randomised, so it eventually turns up.
How you grab depends on the shape: hook a thin part like a foot or ear, wrap the widest part for a solid hold, or take it at its tallest point so it does not tip out.
The hardest to find are the Jumbo Chestnut and Jumbo Bunchan — they are visibly larger than the rest, so compare sizes in the cabinet.
One row: ten perfect shots. It looks trivial and the timing is not.
Pay, pick three backgrounds (which do not matter), then hit a button on the timing marker under the picture as the countdown runs. Nail it and the shot fills with sparkles — that is a perfect shot.
A visit is three photos, so a good run banks three at once — and you do not have to save the photo for it to count.
You can go alone, on a cabaret date, or with Haruka in Premium Adventure — the requirement is the same either way.
Collect parts (5/10/20 tires, 5/10/15 motors, 5/10/20 gears, 5/10/20 frames), race ten times, and win all fourteen events.
New parts appear in the shop after the first, third, fourth, sixth and final races, and get sharply more expensive each time — do not stock up on parts you will not use.
Some parts are not sold at the Stadium: a few come from shops around town, others from other minigames — the Sunshine Decal, Extra Speed Frame and Ultra Soft Tires all come out of Split Bowling.
Per-race builds were worked out by kouryakutsushin.com and tabulated in CyricZ's guide — the Introductory Race, for instance, is Slim tires, Speed frame, Speed motor, Balanced gears and a High Speed battery.
Arcade
MesuKing
Difficulty
Club SEGA Nakamichi St., Kamurocho
Rows at 5, 20 and 45 cards. They come from shops, from the ground around town, and from substories.
Start by talking to the boy in the lab coat at Club SEGA Nakamichi St. — he hands you Omni Choke and Body Slam to begin.
Ebisu Pawn and the Purgatory weapon shop each sell cards at ¥10,000 — Super Elbow Drop and Super Leg Splitter at the pawn shop; Super Piledriver, Counter Heal, Super Double Drop and Mystic Heal in Purgatory.
Six cards come from substories — No.71 Giant Swing, No.72 Finish Time, No.73 Super Romero Special, No.75 Last Resort and No.77 Tie Breaker among them.
The rest lie around town: in front of the vending machines northwest of the Hotel District save point, behind the front tables in Cafe Alps, behind the pin at the Mach Bowl entrance, the far west end of Taihei Blvd., and by the flatbed truck north of the Tenkaichi St. POPPO.
Misc
Cabaret Clubs (Yui & Rina)
Difficulty
The cabaret clubs of Kamurocho
Two rows: finish Yui's substory and Rina's substory. You raise each hostess by picking the right conversation options.
They also gate two karaoke rows — Moment de la Petite Sirene needs Yui along and EURO de x3 SHINE needs Rina — so it pays to push the club side first.
Each substory runs request, conversation, then an after-hours date — and taking that date to the photo booth banks perfect shots at the same time.